 Save
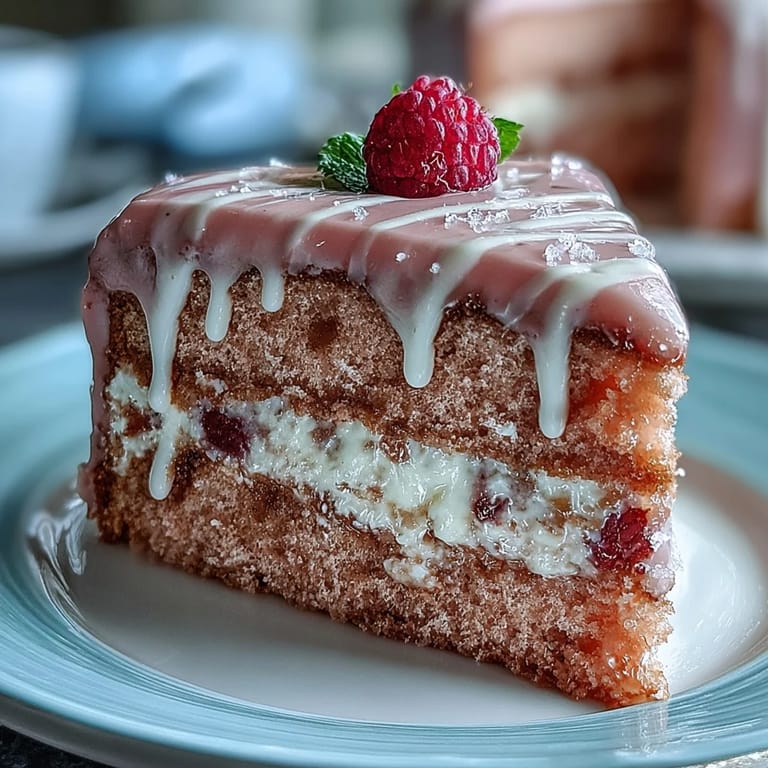
Save The first time I pulled a blushing pink cake from the oven, the kitchen was filled with laughter and the sharp-juicy scent of rosé. There was something magical about seeing those cake layers cool on the rack—the color as delicate as ballet slippers. A few gold-speckled bowls balanced on the counter, and my playlist was interrupted by the mixer whirring butter into a dreamy cloud. Baking this cake isn't just about the end result—every step feels like a celebration. The shimmer of gold at the finish always makes me pause to appreciate the moment.
One Saturday morning, my kitchen counter was a flurry of invitations and crinkled bridesmaid dress swatches, and as I layered the buttercream, someone asked if they could lick the spatula. Moments like those, with friends close by, turned frosting into a group sport and made this cake all the sweeter.
Ingredients
- All-purpose flour: I use a fine-milled brand for a soft crumb; fluff it with a fork before measuring to avoid a dense cake.
- Granulated sugar: This is what gives the cake structure and a delicate sweetness, so be precise with your measurement.
- Baking soda: Trust me, it's the secret to lift every airy bite—don't skimp or the cake can be heavy.
- Fine salt: Just half a teaspoon wakes up all the flavors without making the cake salty.
- Cocoa powder (unsweetened): Go for a good quality powder; just a tablespoon makes the pink color richer, not chocolatey.
- Vegetable oil: I always pick a neutral, fresh oil and pour slowly for the silkiest texture.
- Large eggs, room temperature: Crack them into a bowl first so you don't get accidental shell surprises.
- Buttermilk, room temperature: The buttermilk keeps the crumb tender and tangy; don't substitute plain milk if you want the best result.
- Rosé wine: Choose a bottle you'd actually enjoy drinking—flavors come through.
- Vanilla extract: Add just as the wet mix is whisked for the warmest aroma.
- White vinegar: It reacts with baking soda for a plush rise and a bit of tang.
- Pink or rose gel food coloring: Gel color won't water down the batter like liquid, so start with a little and add more for the prettiest pink.
- Unsalted butter, room temperature (for buttercream): Let it sit out until you can press a finger in easily; cold butter just won't whip up light enough.
- Powdered sugar, sifted: Sifting is annoying but it saves you from lumpy frosting.
- Heavy cream (for gold drip): A couple spoonfuls turn white chocolate silky enough to drip perfectly.
- White chocolate chips: Melt slowly to keep them from seizing, and stir constantly for smoothness.
- Edible gold luster dust: Make sure it actually says edible on the jar.
- Vodka or clear lemon extract: A tiny bit makes gold paint for your drip without leaving an alcohol taste once dry.
Tired of Takeout? 🥡
Get 10 meals you can make faster than delivery arrives. Seriously.
One email. No spam. Unsubscribe anytime.
Instructions
- Prep for success:
- Grease and line your cake pans carefully—a strip of parchment on the bottom guarantees the layers will pop out without a fight.
- Mix your dry & wet teams:
- Whisk the flour, sugar, soda, salt, and cocoa in one bowl; in another, mix oil, eggs, buttermilk, rosé, vanilla, and vinegar until smooth and a bit frothy.
- Color the magic:
- Combine wet into dry and stir just until you can't see flour patches, then fold in the gel coloring until you have a rosy hue that makes you smile.
- Divide and bake:
- Pour the batter evenly into pans and smooth the tops gently. Bake until your kitchen smells sweet and a toothpick emerges clean from a layer's center.
- Cooling time:
- Let cakes cool in their pans, then carefully invert onto racks to finish cooling; warm cakes fall apart when frosted, so patience pays off here.
- Fluffy buttercream dreams:
- Beat butter until it fluffs up, then add powdered sugar a cup at a time. Drizzle in rosé and vanilla and beat again for a cloud-like consistency.
- Stack and fill:
- Level layers if needed and sandwich with your rosy buttercream. Spread a thin coat around the cake (your crumb coat) and chill to lock those crumbs in place.
- Frost and chill:
- Smooth on your final buttercream layer and return the cake to the fridge so everything firms up.
- Crafting the gold drip:
- Melt white chocolate chips and cream together. Cool, drizzle over the cake's edge, and let it run down for that signature elegant look.
- Gold finishing touch:
- Mix edible gold luster dust with a bit of vodka or lemon extract and paint the cooled drip with a soft brush for real sparkle.
- Decorate and dazzle:
- If you're feeling extra, add edible flowers, berries, or more gold details. Step back and admire—this cake's a showstopper.
 Save
Save 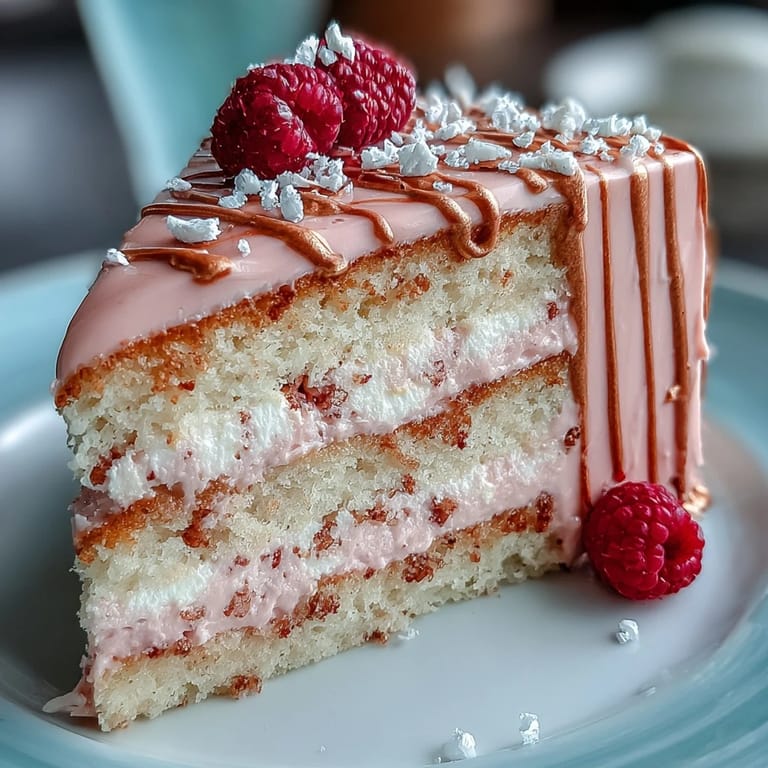 Save
Save The day we gave this cake its golden finish, someone snapped a photo and the happy couple grinned ear to ear. That sparkle on the drizzle somehow made the whole table feel a bit more festive and special.
Making Gorgeous Layers Every Time
If you want those perfectly even layers you see in photos, try using a digital kitchen scale to divide your batter. It's a little extra effort, but it means each piece serves up those beautiful pink stripes and nobody feels shortchanged.
Choosing the Right Rosé
A dry rosé gives the cake a subtle, sophisticated note that never tips into syrupy sweet. I've learned that a splash of sparkling rosé can bring a hint of fizz to the flavor—perfect for truly celebratory bakes.
Decorating Like a Pro Without Stress
Don't be afraid to grab a friend and tag team the drip or gold paint—it's actually more fun as a shared project. If the drip runs too far, just cool the cake a bit longer next time. You can even add fresh flowers (just be sure they're edible or food-safe!) for an Instagram-worthy touch.
- Let the gold drip set before painting for that reflective shimmer.
- Chilling the cake makes decorating much easier and less stressful.
- Keep paper towels handy for easy clean-up as you go.
 Save
Save 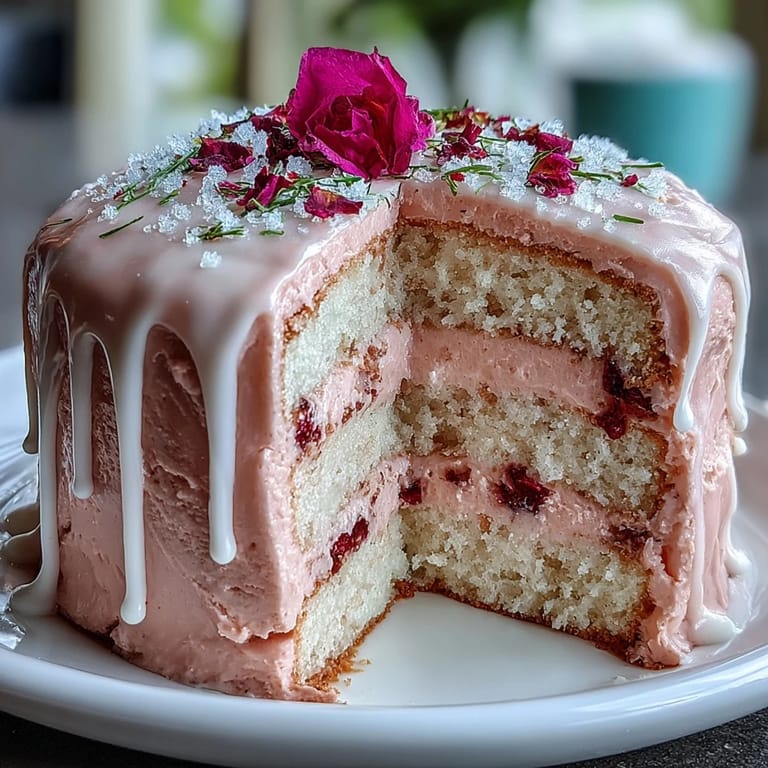 Save
Save Whether it's for a shower, birthday, or just a rosé-themed afternoon, this cake always brings people together with smiles and sparkle. Go ahead and make it your signature celebration treat!
Recipe Questions & Answers
- → Can I use sparkling rosé or should I choose a dry one?
Both work. A dry rosé adds subtle floral and fruity notes without extra fizz, while a sparkling rosé brings a brighter aroma. Much of the alcohol cooks off during baking, so choose based on the flavor lift you want and adjust other liquids slightly if using a very effervescent wine.
- → How do I keep the layers even and get clean slices?
Level each cooled layer with a serrated knife or cake leveler, chill after the crumb coat to firm up the buttercream, and use a sharp, warmed knife wiped between cuts for smooth, even slices.
- → How can I stabilize buttercream when adding rosé?
Add the wine gradually, beat until incorporated, and use powdered sugar to tighten consistency if it becomes loose. Chill briefly if needed; a slightly cooler buttercream holds structure better when stacking and decorating.
- → What can I use instead of vodka for mixing gold luster dust?
Clear lemon extract is a good non-alcoholic option that evaporates quickly and carries flavor. Food-safe glycerin or a small amount of clear high-proof spirit also work; test a small batch to ensure proper paint consistency.
- → How do I get a smooth, shiny gold drip?
Make a white chocolate ganache with the right cream ratio, cool until just pourable, and apply from the center edge to encourage even drips. Paint with edible gold luster while the drip has set but is still tacky for best adhesion and shine.
- → What are the best storage and make-ahead practices?
Assemble and chill the cake up to a day ahead, stored covered in the refrigerator. Bring to room temperature before serving to soften the buttercream. Keep the gold-painted areas dry and avoid non-edible metallics; the finish holds best when protected from humidity.