 Save
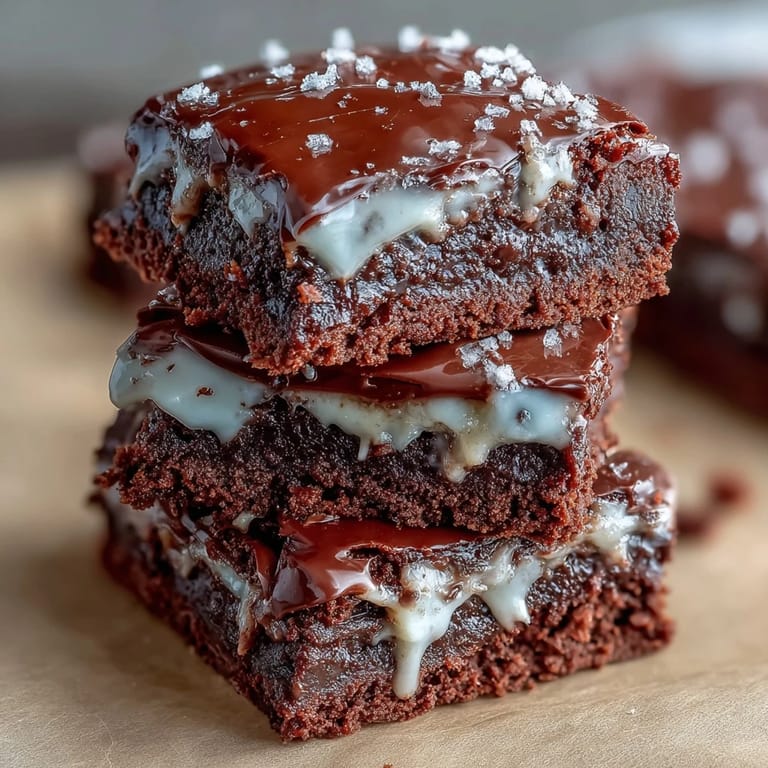
Save Last summer, my neighbor challenged me to bring something that would actually impress the kids at the Fourth of July block party, and I'll admit I was skeptical about mini brownies until I realized they were the perfect excuse to load them with frosting and patriotic sprinkles. There's something about making dozens of tiny treats instead of one big cake that feels more festive, more playful, like you're throwing a celebration in every bite. These fudgy little bites came together in my kitchen on a sticky afternoon, and by evening, they'd become the thing people were actually fighting over at the party.
I remember my daughter's friend asking if she could take an extra one home to her mom, which basically never happens with desserts at that age, and I knew I'd found something special. The frosting was the secret weapon, obviously, but it was watching the kids go completely quiet while eating them that made me realize this recipe deserved a permanent spot in the rotation.
Ingredients
- Unsalted butter (1/2 cup): Melt this slowly and stir it into the sugar first, which creates that silky base that makes brownies fudgy instead of cakey.
- Granulated sugar (1 cup): Don't skip creaming this with butter and eggs, even though it's all mixed by hand, because the air you're beating in makes them tender.
- Large eggs (2): Room temperature eggs blend smoother and help the batter rise just enough, so pull them out 10 minutes before cooking.
- Vanilla extract (1 teaspoon): Use the real stuff here if you can, because it balances the cocoa intensity in a way imitation never quite does.
- Unsweetened cocoa powder (1/3 cup): This is your chocolate moment, so make sure it's fresh and sifted to avoid lumps that'll wreck the texture.
- All-purpose flour (1/2 cup): Measure by spooning and leveling, not scooping straight from the bag, which I learned after making dense hockey pucks.
- Salt (1/4 teaspoon): Trust the salt even though it seems tiny, it sharpens every chocolate flavor and makes the frosting taste less one-note sweet.
- Baking powder (1/4 teaspoon): Just a whisper of this lifts them slightly so they're not dense little pucks, though you want them still fudgy in the middle.
- Cream cheese (4 oz): Softening this properly is non-negotiable, or you'll get lumps in your frosting that no amount of mixing fixes.
- Butter for frosting (2 tablespoons): Keep this separate from your brownie butter and make sure it's soft, like the texture of a ripe avocado.
- Powdered sugar (1 cup): Sift this before adding it or you'll have gritty frosting, which sounds like a small thing until you bite into it.
- Vanilla extract for frosting (1/2 teaspoon): A half teaspoon is enough here since the cream cheese already brings tang, so you're just lifting the sweetness slightly.
- Milk (1-2 tablespoons): Add this one tablespoon at a time while beating, because the frosting texture changes instantly and you can't take it back.
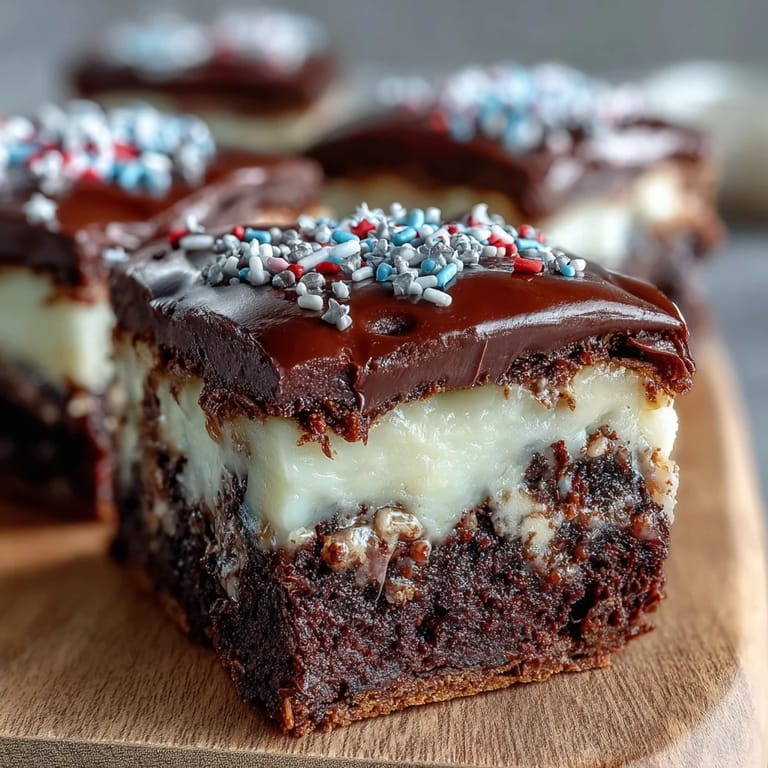
- Red, white, and blue sprinkles: Buy the sprinkles a day before so you're not stress shopping the morning of the party.
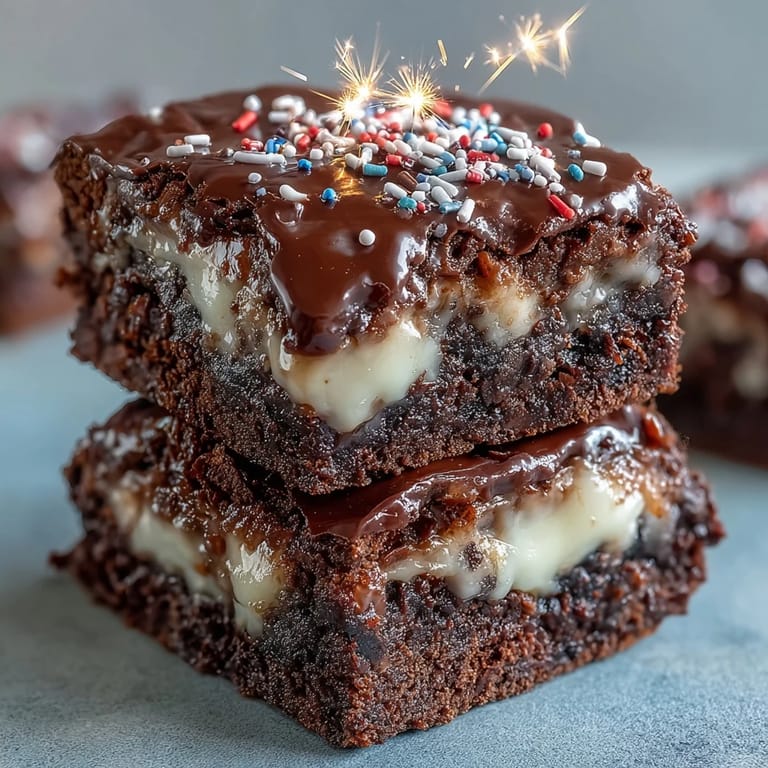
- Mini sparkler toppers or festive toothpicks (optional): These transform boring frosted bites into something that feels celebratory the moment someone sees them.
Tired of Takeout? 🥡
Get 10 meals you can make faster than delivery arrives. Seriously.
One email. No spam. Unsubscribe anytime.
Instructions
- Get your station ready:
- Preheat the oven to 350°F and grease your mini muffin pan with a little butter or cooking spray, making sure you get into all those tiny cups because nothing sticks like overlooked corners. If you've got mini paper liners, use those instead and skip the greasing because they peel off clean and look cute.
- Melt and mix your base:
- Put the butter in a microwave-safe bowl and heat it for about 45 seconds until it's completely melted but not sizzling, then stir in the sugar, eggs, and vanilla like you're waking them up. You want this mixture smooth and slightly glossy, which takes about a minute of stirring and honestly feels meditative.
- Fold in the dry ingredients:
- Sift the cocoa powder right over the wet mixture if you've got a sifter, then sprinkle in the flour, salt, and baking powder all at once. Stir just until the flour disappears and everything looks like thick brownie batter, and stop stirring the moment you can't see streaks of flour because overmixing makes them tough.
- Fill your muffin cups:
- Spoon the batter into each cup until it reaches about three-quarters up the sides, which leaves room for the tiniest rise and means they stay tender. If you're worried about uneven filling, use a cookie scoop instead of a spoon, which changes your life in the best way.
- Bake until just right:
- Slide them into the oven and set a timer for 12 minutes, then peek at 13 minutes because every oven runs different and you're hunting for that moment when a toothpick comes out with a few moist crumbs still clinging to it. If it comes out completely clean, they're overbaked; if it's wet batter, give them another minute, but mostly you're looking for that fudgy middle that feels almost undercooked.
- Cool with patience:
- Let them sit in the pan for 5 minutes while they firm up enough to move, then turn them out onto a wire rack and let them cool completely before touching them again. Frosting warm brownies is a crime against the frosting, so make a cup of coffee and find something to do for 20 minutes.
- Make the frosting magic:
- Beat the softened cream cheese and butter together for about 2 minutes until they look light and fluffy, then gradually add the powdered sugar while the mixer runs. Once everything is combined, add the vanilla and milk one tablespoon at a time until the frosting is thick enough to hold peaks but spreadable enough to pipe.
- Frost and decorate:
- Pipe or spread a generous dollop of frosting onto each cooled brownie bite, then immediately scatter the red, white, and blue sprinkles over the top before the frosting sets. Top with a mini sparkler or festive toothpick if you want them to feel extra special, and take a moment to admire what you've made because this is the moment where they transform from brownies into party stars.
 Save
Save There was this moment at the party when my son's friend, who's normally picky about chocolate, came back for a third one and told me it tasted like "fancy brownies," which is basically the highest compliment you can get from a nine-year-old. These little bites stopped being a recipe after that and became proof that sometimes the best celebrations happen when you put care into the tiny details.
Why Mini Bites Matter More Than You'd Think
There's psychology to serving tiny versions of things at parties, and I discovered it by accident when people grabbed three of these instead of fighting over one big brownie. The small size makes people feel like they can have seconds without guilt, the ratio of frosting to brownie is somehow more generous, and they cool down faster so you can actually eat them without burning your mouth. Plus, kids will actually finish them instead of taking three bites and leaving chocolate smudges on furniture.
The Frosting Game Changer
Cream cheese frosting is what separates these from standard school bake sale brownies, and once you realize you can pipe it instead of just spreading it, everything changes. The tanginess cuts through the chocolate richness, and the frosting stays stable enough that you can actually decorate them ahead of time without everything sliding off. I've made these for three consecutive Fourth of July parties now, and the frosting is what people actually ask about in the group chat the next day.
Storage and Make-Ahead Moments
These actually taste better the next day after the flavors meld together, so you can bake them the day before and frost them on the morning of the party without losing any magic. They keep in an airtight container in the fridge for three days, though they rarely last that long in my house, and you can even freeze the unfrosted brownies for up to a month if you're planning ahead. Here are some thoughts that made my life easier:
- Frost them the morning of your party so the toppings don't have time to slide around, and keep them in the fridge until you're ready to serve.
- Make the frosting up to two days ahead and store it covered, then just beat it again for 30 seconds before piping because it firms up slightly in the fridge.
- Double the batch and freeze half the unfrosted brownies because once people know you can make these, you'll get requests for other occasions too.
 Save
Save Every time I make these now, I think about that moment at the block party when something so simple became the thing people remembered most about the food. These little bites somehow turned a regular holiday party into something worth talking about, and that's really what cooking is all about.
Recipe Questions & Answers
- → What type of pan is best for these brownie bites?
A 24-cup mini muffin pan works best to create evenly sized bite portions that bake quickly and uniformly.
- → Can I substitute the all-purpose flour for gluten-free flour?
Yes, gluten-free flour can be used as a direct substitute to make these bites gluten-free without sacrificing texture.
- → How can I make the frosting spreadable yet thick?
Beat softened cream cheese and butter until creamy, then gradually add powdered sugar and vanilla. Add milk one tablespoon at a time to reach a spreadable consistency.
- → What is the baking time and temperature for these bites?
Bake at 350°F (175°C) for 12–15 minutes or until a toothpick inserted comes out with moist crumbs.
- → How should these treats be stored after preparation?
Store in an airtight container in the refrigerator for up to 3 days to maintain freshness and texture.